

EveryPersonnelFile
EveryPersonnelFile is a premium plugin for EveryDataStore ECM that serves as the central repository for managing and archiving all employee-related data. It helps organizations maintain structured and complete personnel records, including contact, employment, and contract information.
This plugin is essential for HR departments and administrators who want to centralize employee data, ensure compliance, and improve operational efficiency. It is recommended to use EveryPersonnelFile in combination with:
- EveryCalendar – Required for scheduling and shift assignment
- EveryTimeTracker – Recommended for time tracking and daily reporting
Key Capabilities
- Centralized employee data management
- Structured personnel file system with sections for personal, contact, and contract details
- Integrated document management per employee
- Integration with calendars and time tracking for comprehensive workforce management
- Supports employee lifecycle documentation from onboarding to termination
- Prepares HR teams for audits, compliance, and data-driven decisions
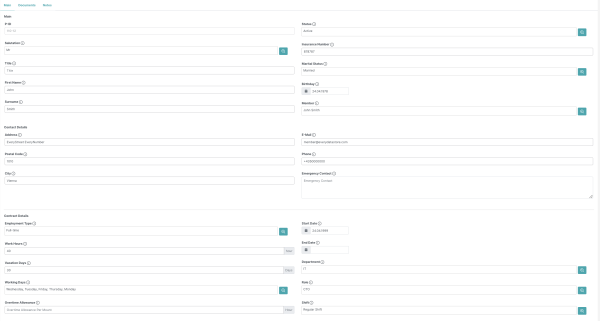
Sections and Data Fields
Each personnel file contains the following metadata:
Main Information
- P-ID – Unique system-generated identifier
- Salutation – Mr, Ms, etc.
- Title – Dr, Prof., etc.
- First Name – Employee's first name
- Surname – Employee's surname
- Status – Active or Inactive employment status
- Birthday – Date of birth
- Insurance Number – National insurance/social security number
- Marital Status – Marital status of the employee
- Member – Relation to the "Member" model
Contact Details
- E-Mail – Work or personal email address
- Phone Number – Contact number
- Address – Street name and house number
- Postal Code – ZIP or postal code
- City – City of residence
- Emergency Contact – Person to contact in case of emergency
Contract Details
- Employment Type – Part-Time, Full-Time, Freelance, or Trainee
- Working Hours – Weekly contracted working hours
- Working Days – Weekdays the employee regularly works
- Vacation Days – Annual leave entitlement
- Overtime Allowance – Allowed overtime per month
- Start Date – Start of employment
- End Date – End of employment
- Department – Assigned department
- Role – Position or function in the department
- Shift – Assigned working shifts
Document Management
Each employee record includes a dedicated "Documents" tab with a structured folder tree. This enables HR staff and managers to upload and manage employee-related files in categorized subfolders.
The following document types can be archived per employee:
- Application – Job application and cover letters
- Certificate – Educational and professional certificates
- Driver License – Scans or copies of driving licenses
- Interviews – Notes or recordings from interviews
- Proof Of Salary – Monthly or yearly salary statements
- Time-Report – Exported reports from time tracking (e.g., from EveryTimeTracker)

This modular file structure ensures compliance with documentation policies, and simplifies the retrieval of HR-relevant documents.


