

You can find your desired database under the "Databases" section in the "Administration" menu.
If you want to make changes—such as adding or removing form fields, or updating database and field properties—you can do so in Edit mode.
To access Edit mode, simply click the green “Edit” button located next to the database you want to update.

This gives you access to all the settings available when first creating the database, including the “Database” and “Form” tabs.
If the "EveryVersionHistory" app is installed, you will also see a “Version” tab on this screen. This tab provides a detailed history of all previous changes made to the database, along with a preview of each version and the ability to rollback to a previous state if needed.
In the “Form” tab, you can easily add or remove fields, sections, and columns. To modify field properties, simply click the “Edit” button in the upper right corner of the field area. This will open a pop-up dialog where you can adjust the field settings.
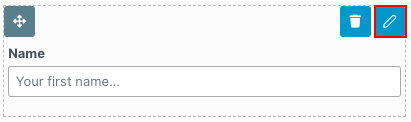
Each field and column includes a “Delete” button located in the upper right corner.
To delete an entire section, click the “Delete” button found to the left of the section’s title.
When prompted by the confirmation pop-up dialog, choose “Yes” to permanently remove the selected field or section from the form.
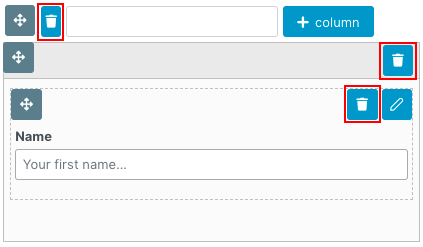
Fields, columns, and sections can easily be rearranged using drag and drop. Simply click and hold the handle in the upper left corner of the desired field, column, or section, drag it to the new position, and release the mouse button to drop it there.

To save your changes, click on the “Save” or “Save & Exit” button located in the bottom left corner of the page. If you want to exit without saving, click on the “Cancel” button in the bottom right corner. ![]()


