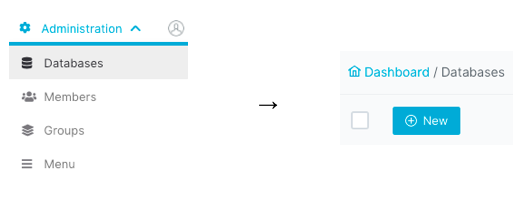
In EveryDataStore, a Database—also known as a RecordSet—is a structured collection of data items. To create a new one, navigate to Administration > Databases in the main menu.
At the top-left corner, click the “New” button to start the creation process. This will open the Database tab, where you can:

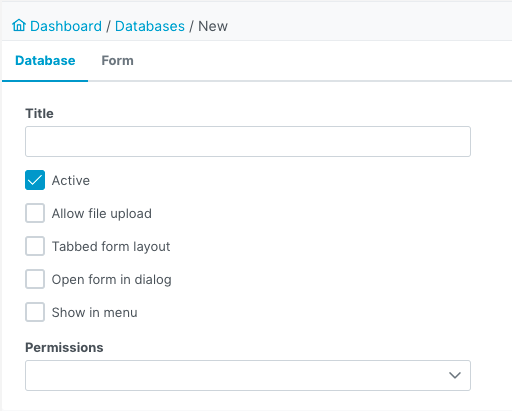
This will initiate the appearance of the following dialog window:

Here, in the “Database” tab, “Title” field should be filled in with desired name of the new database
and underneath the desired properties of database should be selected.
Below you can find the list of supported properties:
|
Option |
Description |
|---|---|
|
Active |
Database will be available to users |
|
Allow file upload |
RecordSetItems of the database may contain attached documents such as images, text documents, pdf files, etc. Note: This feature is described in detail in "Documents" section. |
|
Tabbed form layout |
Refers to the appearance of the database to the users when creating a new RecordSetItem: each column will appear as a different tab |
|
Open form in dialog |
Refers to the appearance of the database: the form for creating a new RecordSet will appear as a new dialog on top of the current window |
|
Show in menu |
Database will appear in one of the menus. Checking this box will initiate appearance of another setting: here you can choose in which menu your database shall appear |
|
Permissions |
Users or group of users that will have access to this database |
Note: It is possible to change any of these settings later.
What data will be stored in the database (from the example above: Name, Birth Date, Address, E-mail,...)
is defined and managed in the “Form” tab.
More details on how to create a desired Form structure can be found in the "Smart Form Builder" chapter.
Good practice is to save properties described above by clicking on the "Save" button before continuing with form creation.


